Wedding decor DIYs! :D
- emikodshte
- Aug 19, 2021
- 3 min read

Finally received our gorgeous photos by liamsoulphoto!! :D Thank youuuuuu!


It has been a few months since our wedding, and looking back, it kind of feels surreal! All that time spent prior to the wedding and all it took was a few hours, and it was over! Although it was initially overwhelming as my mind was all over the place, uncertain of what aspects a wedding entailed as I haven't had any experience for wedding planning, overall, being the planner I am, I thoroughly enjoyed it! :D
After research on what to do for the invitation cards and the printing solutions we could use, I eventually managed to find thefoilsmith (instagram), and ended up having Jenna do quite a few of the things we needed for the wedding!
It was such a breeze; I made the designs on Adobe Illustrator and sent it over to her, and she was so quick, and everything looked so good! :D
- invitation cards and stickers for wedding favour bags: gold foil printing
- pate knives and ring boxes: wood laser engraving
- black acrylic cake topper
(Photos taken by thefoilsmith)


For the wishing well and wedding sign, I first made the text designs on Adobe Illustrator and then printed it out to size, and taped it before using an acrylic marker to trace the text!
Acrylic marker - Gordon Harris
Black box - Kmart
White fur base - leftover from making my DIY shawl
Faux flowers - our aliexpress order


For the wedding sign, I used Rasterbator to enlarge my design size to the desired size, and the design was printed onto multiple sheets of A4 paper before I taped them up to trace! We really liked the gold/white/marble theme, so with a pinterest find as inspiration, and couple of youtube videos after, I set out to paint the other side of the acrylic sheet (also from Gordon Harris!). My initial white/gold paint didn't turn out quite how I wanted, so it did take a couple of acetone rubbings to rub them all away before painting again!
While I took care of the sign, Cody gave a new lease of life and tidied up/sanded/ordered new parts/fixed/painted the easel that was abandoned in the shed at work! :D After our wedding, Cody cut some architrave wood and made a frame for the sign; this now hangs on our bedroom wall! :)


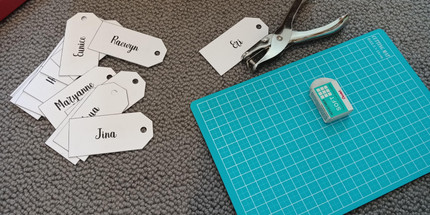
Other designs made on Adobe Illustrator included the gift tags, table number, guestbook frame and photostrip text design. The black book was from kmart, and I used carbon paper to trace the text design before filling it in with gold marker pen!
(Our photobooth hire was from Pixel Photobooth, and after I sent in our text design and photos of other decor, they designed a photostrip accordingly to match the theme! :)


For table centrepieces, we were blessed with glass bottles from our celebrant :) Did the ombre effect with white spray paint and then gold!
Mum and me arranged the faux flowers for the centrepieces, and I attached ribbon and thin elastic cord to a few flower stalks, so that they could easily be slipped over the ear of the aisle chairs on the day itself :)
I was contemplating to hand-write the place cards or use a digital printing place so that it was nicer, but I was blessed to find gold-spotted place cards at The Warehouse that matched our goldish theme, so hand-writing it was~


Although it wasn't super 'professional', but I really enjoyed the design and DIY aspects of the planning and decor! I think the experience itself was really memorable and all part of the whole journey, and I wouldn't have had it any other way :)
Thank you all for the congratulatory wishes; there were many that we hoped could have joined us but because of travel restrictions, it was not possible. Hopefully we get to meet again soon! :) :)


Comments