Making my own wedding dress!
- emikodshte
- Jun 9, 2021
- 5 min read

I never dreamt that I would make my own wedding dress, but sew did I!
When I had started messing around with my existing clothes, it never occurred to me that I might one day make the dress that I would wear for such an important or meaningful day of my life! All thanks to the youtubers who I followed for sewing tutorials, some of them had gone before me and done it, and posted up all their own experiences, mistakes and tutorials; this idea would never have even taken root and eventuated without them! :)
Some of them included withwendy, seamingly sera and coolirpa!
Although I would never have been able to video record the whole process like how they did, I definitely did not want to miss recording the very steps I had taken, for my own memories (and for anyone else who might want to)! :D
Lots and lots of research
Obviously wedding dresses was a completely novel topic of interest for me; I had never really thought about what kind of wedding dress I would like, so I really had to scour pinterest and google! Initially thought I would go with an A-line dress, but after trying on one at the rental shop, it was not quite what I thought it would look like! I then thought that maybe the other gown I had tried on was a mermaid dress and looked up on them and the ways I could make them, but eventually after some draft attempts, decided that what I really wanted was actually a sheath dress!
Below is the process of the final dress, and doesn't include photos of the mistakes/drafts made in earlier trial attempts with the materials/techniques.
Dress drafting
I can't even count the number of youtube videos I watched before I finally decided on the actual shape I wanted and figured out the ways to measure and draft its patterns! I used calico that I got for the emporium for my drafts, and this was the almost-final trial draft for the sweetheart bodice and pencil/sheath skirt pattern with a slight flare at the bottom, as well as a train for the back.
And tadah, came the the long awaited arrival of tulle and lace applique that I had gotten from aliexpress! :D :D


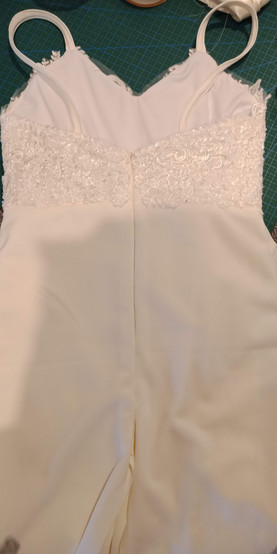
Actual bodice
I did have to make multiple amends for the bodice pattern so as to get the amount of bust curves right for my small chest size! *laughs* With the final amended draft bodice, I then proceeded to cut and sew
my lining pieces (white lining stretch fabric from spotlight)
main fabric pieces (ivory scube crepe from spotlight)
tulle pieces
For the tulle bodice, I taped the bottom of my presser foot so that the tulle would feed in properly!
I then sewed the main and lining pieces right sides facing, leaving the parts for the straps unstitched. I then turned it right way out so that I could see how the tulle bodice would lay above it.


Lace applique
So much excitement with the lace applique! :D I had ordered quite a few as I could not decide which one I liked, (and originally thought I would use them for the train and veil but did not in the end!)
I cut little sections of them and pinned it to the tulle bodice sewn before, and pinned the nights away!
In sewing on the lace applique to the tulle, I dropped the feed dogs and used a universal/16 needle, and removed the presser foot. It was so scary to hold down the fabric so close to the needle, as I had seen in the youtube videos; after a few minutes I opened my sewing drawer and found my trusty disposable chopstick! With my left hand holding down the material further away from the needle, I used the chopstick in my right hand to hold down the material on the right side so that my fingers were safe from the needle!


Skirt
I made final amendments to my paper pattern before cutting out on the main fabric.
I used stretch/11 needles and a walking foot for my stretch fabrics. (On an initial trial with the fabric, I had done it with my normal presser foot and it definitely ruined the dress as the top and bottom fabric were not feeding in together. I had to pause all my efforts to go purchase the walking foot and start anew!)
At this stage, I had sewn the bodice to the skirt (main fabric), and for the lining, I had cut my skirt pattern to knee-length using the same main fabric, and sewed it to the bodice lining (white stretch lining fabric).


Straps and understitching
I then cut and sewed the straps, turned it right way out, and inserted them into the gaps I had left unstitched on the bodice, before sewing them in.
On hindsight, I should have done the straps in a non-stretchy fabric so that it doesn't overstretch its length.
I then understitched the top of the bodice by stitching the lining fabric to the seam allowance within. I think I then hand sewed the tulle+lace applique bodice, to the main bodice before trimming the excess tulle at the top.


Zip
The zipper was probably the most nerve-wrecking of the process, as I definitely did not want to screw it up at this late stage when any mistakes made meant that I had to make the whole dress again. I had never sewed a zipper to stretch fabric before, nor sewed it to both a main and lining fabric. With all the research I had, I set out to buy a few more things, though I ended up not using every single thing I bought.
It was tricky to find the right interfacing in Spotlight as the names were different than the American-based ones I saw online, but one of the websites talked about grosgrain ribbon, so that I bought! I sewed the ribbon to the main and lining fabric first to 'stabilise' the stretch fabric.
Of all mistakes I had to make for the wedding dress, I did not first iron the invisible zipper! In the end, the zipper track was causing the fabric to get caught, and I had to seam rip and take out the zipper and do it all over again!
I believe I had to adjust the needle position for when I sewed the zipper for the main vs. lining fabric!


Bottom seam
After I completed the zipper, I finally got the chance to try on the dress as a dress without clips and pins! I then sewed the seam for from the bottom of the zipper, to the bottom of the dress.
I had initially planned to cut my dress to knee length after the wedding, so that I could wear it on occasions. The lining dress was thus made to knee length, but little did I know that the knee length cut-off would be seen through the main fabric! And so I had to improvise!!! ):


Hemming and lining extension
Last stretch!! I checked the bodice and hand-sewed the lace applique that were not securely stitched on.
I also cut out an extension for the skirt lining and sewed and attached the pieces and dress together, but then I had to bring the seams in so that the silhouette was not too apparent through the main dress.
After hanging up the dress for a few days, I then staystitched the bottom hem, pressed it with the iron, and then hemmed it.


and teeheeeee.....
The dress made it! :D :D :D With a faux fur shawl sewn to go with it, though I ended up not needing it because the weather was perfect enough! :D
Some shots from our First Look, before the wedding ceremony! :D


Not a super fancy dress, but if I had to rewind time, I would still have chosen this style to do it by myself again! :D :D


Comments